Modal Dialogs with SwiftUI
A modal dialog is an interaction that interrupts the normal workflow and prevents anything happening except the dialog. The old Alert is a perfect example. When an Alert comes up you can do nothing but engage with the Alert.
SwiftUI has the Alert, but if you want to roll your own modal dialogs you have a take some things into account. You can use a SwiftUI Alert anywhere in your app. When the Alert is activated, it rises about all other content and puts up an input block to the rest of your app. Once the Alert has been addressed, it and the block go away.
And this is a key point: it rises above all other content no matter where in your View hierarchy it has been dispatched. If you want this same behavior in a custom modal dialog, you have to place it at the top of your View hierarchy, generally on the ContentView or whatever you are using as your main View.
I’ve come up with a way that makes it easier to mange and allows you to invoke your dialog anywhere in your app. The solution lies with two things: ObservableObject (in the form of a model) and enums with associated values.

A little while ago I wrote two blog articles: MultiDatePicker and custom sheets using .overlay. I’m going to combine these two in this article to show you what I came up with.
The Problem
First, it is not important that you use MultiDataPicker. I am using it here because its a control that takes a binding element and could work well as a modal dialog. But I could also use a TextField just as well. The custom sheets article basically moves the presentation of the sheet into a ViewModifier. I will use some of that here.
Secondly, I am creating a single modal dialog, but if you want to have different types (eg, pick a date, enter a phone number, rate a restaurant, etc.), you can easily adapt this example.
The idea is that from anywhere in your app you want to present the user with a modal dialog. The dialog should be above everything else and it should provide an input blocker so the user cannot use the app without addressing the modal dialog. Now I’m not saying using modal dialogs is a good or bad idea. But sometimes you need to get some info from the user at a particular point in time. For example:
You are on a travel site and pick the tab at the bottom for hotels.
The tab shows you a view with a list of hotels. You tap one of the hotels and navigates to a detail view about that hotel.
You pick the “Reservations” button, taking you a step deeper into the app to the reservations view.
Now you are on the Reservations view with a place to set your dates. You have traveled to:
ContentView->Hotel List View->Hotel Detail View->Reservations View.You now tap the dates field. If the app uses the SwiftUI
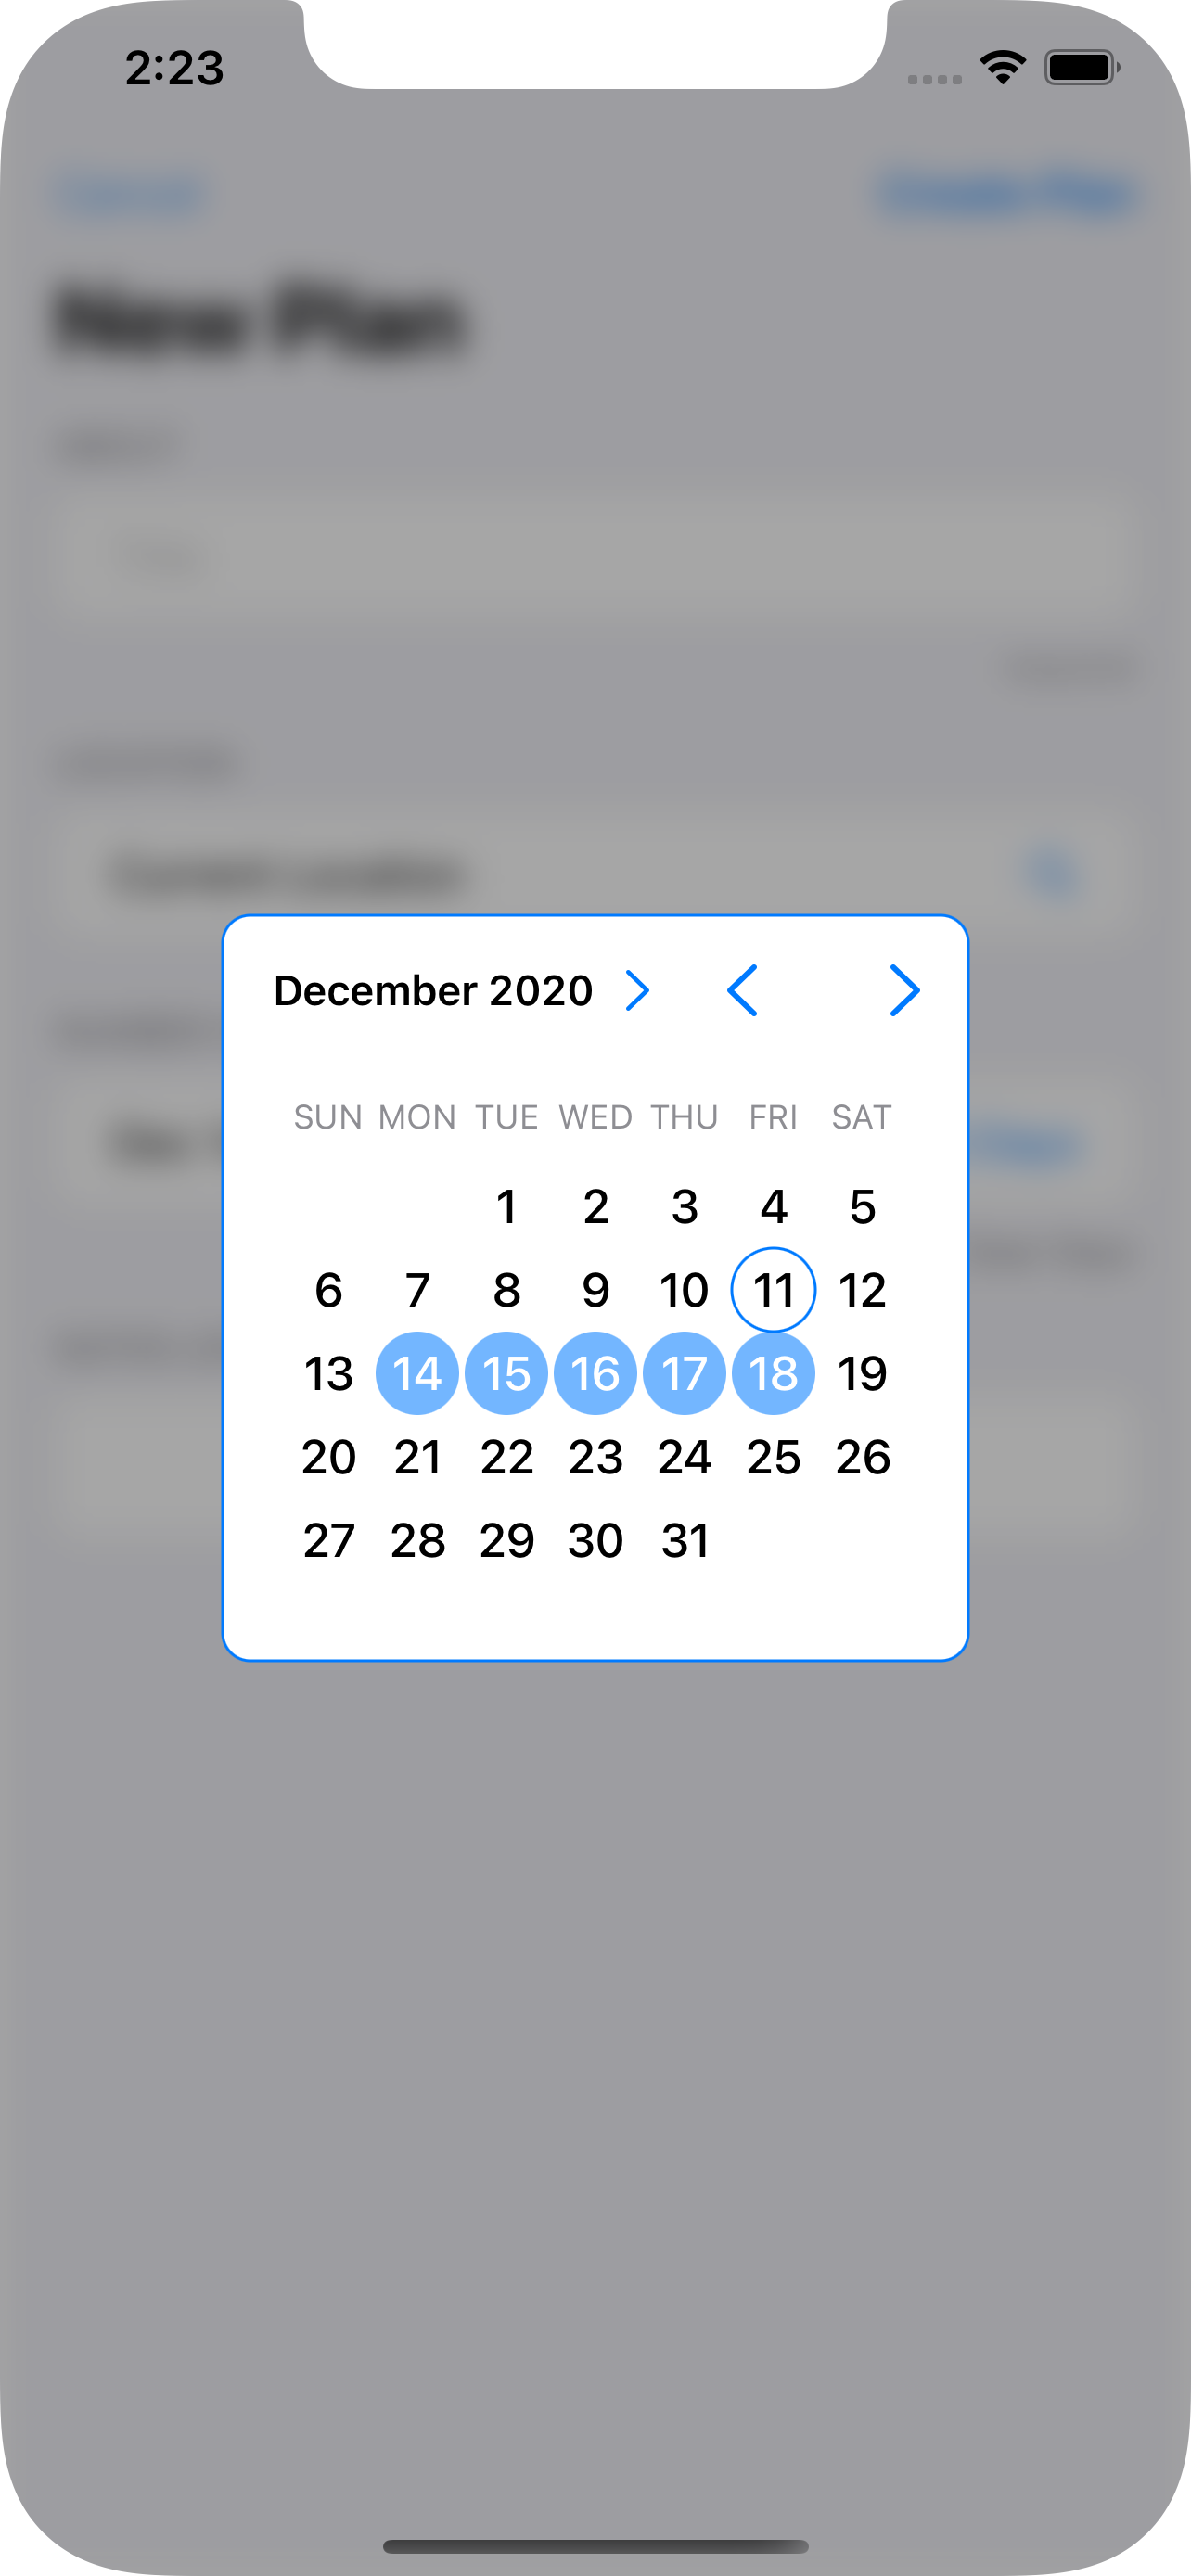
DatePickeryou are golden because it already operates as a modal dialog. But the developer of this app wants you to pick a date range (eg, check in, check out) decided to useMultiDatePickerinstead.The
MultiDatePickerappears floating above all other contents - the Navigation bar and the Tab bar, too, not just the content of the Reservations Screen (which might actually be a sub-area of another screen).
The Solution
The Dialog Model
We begin with the Dialog Model. This is a class that implements ObservableObject because we want to use it to set the type of dialog to open.
class DialogModel: NSObject, ObservableObject {
    @Published var dialogType: DialogType = .none
}
You see that it has a single @Published value for the dialogType. That is an enum defined as follows:
public enum DialogType {
    case none
    case dateDialog(Binding<ClosedRange<Date>?>)
  // add more enum cases and associated values for each dialog type.
}
What’s interesting about this enum is that for the dateDialog member, there is an associated value of ClosedRange<Date>? wrapped as a Binding. And it just so happens the MultiDatePicker has an initializer that also calls for an optional closed date range.
The Dialog Modifier
The next thing we are going to do is create a ViewModifier to activate the modal dialog based on the dialogType value of the DialogModel.
private struct DialogModifier: ViewModifier {

    // 1.
    @ObservedObject var dialogModel: DialogModel

    func body(content: Content) -> some View {
        content
            // 2.
            .overlay(
                Group {
                    switch dialogModel.dialogType {
                    // 3.
                    case .dateDialog(let dateRange):
                        ZStack {
                           // 4.
                            Color.black.opacity(0.35)
                                .zIndex(0)
                                .onTapGesture {
                                    withAnimation {
                                        self.dialogModel.dialogType = .none
                                    }
                                }
                            // 5.
                            MultiDatePicker(dateRange: dateRange)
                                .zIndex(1)
                        }
                        .edgesIgnoringSafeArea(.all)
                    default:
                        EmptyView()
                    }
                }
            )
    }
}
Some important bits about this DialogModifier:
This
ViewModifierneeds to use theDialogModelinstance, so it is declared as an@ObservedObjectbecause it implements theObservableObjectprotocol and because we want this to react to changes in its@Publishedmember,dialogType.An overlay is used to place Views above the
content. AGroupis used to select what to put into the overlay: anEmptyViewif no dialog is being displayed or aZStackwith the overlay Views.A
switchandcasestatement select for the dialog and grabs theBindingfrom the enum’s associated value.A simple
Coloris used for the blocker and a tap gesture set to make it possible to dismiss the dialog.The
MultiDatePickeritself, passing theenum’s associated value (dateRange) at initialization.
One thing to note: use static .zIndex values if using transitions with Views (which I did not use here, but you might want them).
Now let’s make this clean to use in the application with a little View extension:
extension View {
    func dialog(_ model: DialogModel) -> some View {
        self.modifier(DialogModifier(dialogModel: model))
    }
}
Applying the Dialog Modifier
This little extension function makes it a little bit nicer to apply the modifier:
import SwiftUI

@main
struct PlanWizardApp: App {
    // 1.
    @StateObject var dialogModel = DialogModel()

    var body: some Scene {
        WindowGroup {
            ContentView()
                // 2.
                .environmentObject(dialogModel)
                // 3.
                .dialog(dialogModel)
        }
    }
}
Declare and instantiate the
DialogModel. You want this to stick around so use@StateObject.Pass the
DialogModeldown into the app content views.Apply the
DialogModifierthrough the handy extension function, passing along theDialogModel.
That has set everything up. I told you that the dialogs needed to be at the top level, so it is in the App definition! When the DialogModel’s dialogType enum is set, the DialogModifier will take notice and display the appropriate dialog as an overlay on ContentView.
Showing the Dialog
So how do you actually make this work? Let’s assume you’ve got a Form someplace and it is from there you want to pop up the MultiDatePicker and display a date:
// 1.
@EnvironmentObject var dialogModel: DialogModel
// 2.
@State private var dateRange: ClosedRange<Date>? = nil
Form {
  // ...
  Section(header: Text("Dates")) {
    HStack {
      Text("\(dateRange)") // 3.
      Spacer()
      Button("Pick Dates") {
        // 4.
        self.dialogModel.dialogType = .dateDialog(self.$dateRange)
      }
    }
  }
}
Bring in the
DialogModelfor use in this View (see step 4).Declare a
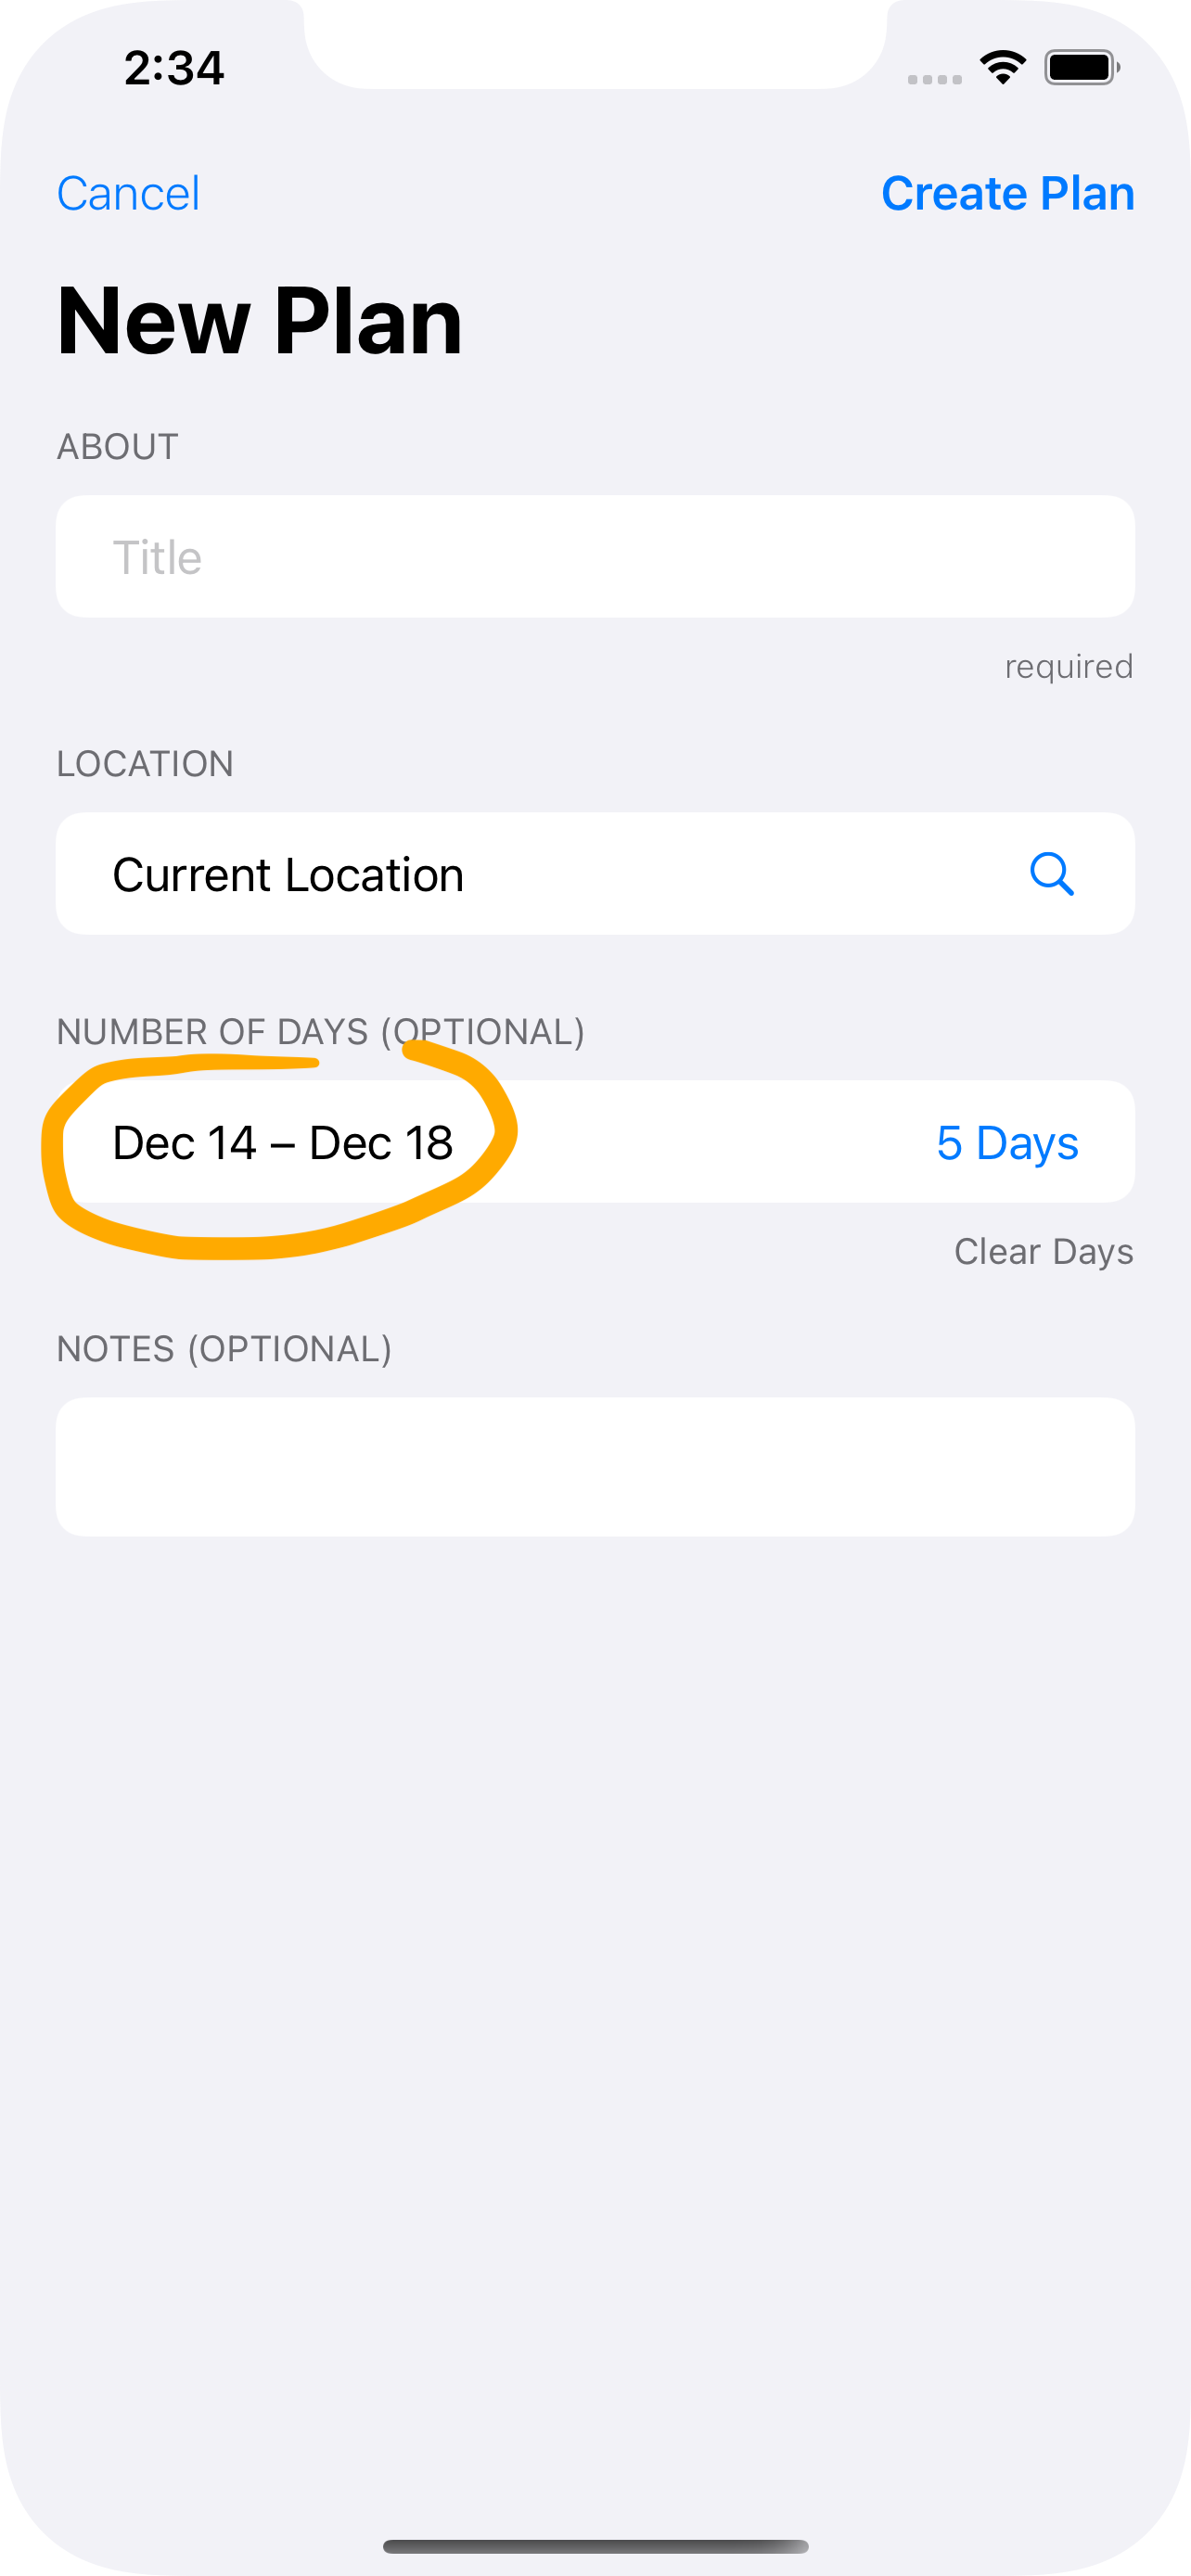
varto hold the selected date range. In a real app you probably have this as part of some data model.Display the range selected. You will need a little more code here, but the idea is to show that this value has in fact changed.
Here is the key. When the
Pick Datesbutton is tapped, theDialogModelis set with the.dateDialogvalue and the associated value for theenumis set as a binding toself.dateRange. This is passed into theMultiDatePickerby theDateModifier. And because thedialogTypeis an@Publishedvarof theDialogModel, SwiftUI will cause theDateModifierto be executed and theMultiDatePickerwill appear as an overlay ofContentViewinside aZStack.
Summary
Maybe the ending was a little anticlimactic, but I think it paid off nicely.
Overlays only apply to the View they are attached to. If you want a “dialog” to appear above all other content you have to place the overlay on the topmost View. In this case,
ContentView. And do so in theAppdefinition.Overlays are modifiers, so a good place to encapsulate them is with a custom modifier like
DialogModifier. It can check a flag to see if the dialog view should be displayed or not. In this case itsdialogTypeof theDialogModel.You need to communicate the desire to see the dialog from anywhere in the app code all the way up to the
appdefinition. The best way to do that in SwiftUI is with anObservableObjectshared throughout the app using@EnvironmentObject(you could also define this as an@Environmentif you prefer).You also need to communicate data from the dialog back to whatever wants to see it (generally to a
@Statevar declared in the View that triggered the dialog’s appearance). One way to do that is through anenumwith an associated value that is aBinding.Combining the
enumsetter with@Publishedin theObservableObjectmodel make a good way to trigger the appearance of the dialog as well as provide a data bridge using aBinding.
So there you have it. I hope if you need dialogs (or even a centralized location for .sheet and .alert modifiers) you will find this solution handy.